


")


Microsoft is investing a lot into its new Server Manager though Redmond is not encouraging that parallelism and often says that Windows Admin Center is not a 1-to-1 replacement for Server Manager. That is true because Server Manager and its underlying technology has a deeper connection with the operating system and it can be considered a platform while Winows Admin Center can be considered a very sophisticated shell that mostly works through WMI/Powershell connections.
However, Windows Admin Center is gaining a lot of traction and it’s quickly gaining support because its Web UI allows to embed important tasks into simple to access and to use widgets called tools and access them through a simple browser. Productivity is enhanced especially when used with the Core version of Windows operating systems and I’m not surprised that Microsoft is experiencing a growth in adoption for the Core SKUs because of it.
Why containerizing Windows Admin Center ?
So the first question would be: why would someone want to containerize Windows Admin Center ? First, a containerized WAC would be very easy to deploy on multiple systems in a very straightforward way. Furthermore, multiple copies of WAC, possibly in use by different teams, could be deployed and used thanks to the isolation provided by containers and their flexibility. Containers could be also useful to mitigate any security issue that could arise even if Windows Admin Center showed no security vulnerabilities as far as I know. Finally, by using Hyper-V isolation multiple instances of WAC could be isolated and provided to multiple tenants.
Prepare the environment
To deploy WAC into a container we will use Windows Server 2019. We must first enable containers support by selecting and adding the feature in Roles&Features section of Server Manager:
Then we must install Docker as per Microsoft Docs :
Install-Module -Name DockerMsftProvider -Repository PSGallery -Force
and then
Install-Package -Name docker -ProviderName DockerMsftProvider
and finally restore Windows Server 2019 to complete installation
Restart-Computer -Force
When server restarts we can pull the Windows Server 2019 Core image that we will use to run Windows Admin Center. Note that WAC doesn’t need IIS because it will self-host so downloading the base OS image will be enough
docker pull mcr.microsoft.com/windows/servercore:ltsc2019
After downloading the image we are now ready to spin our new container and install Windows Admin Center.
Create the WAC container
We have a choice to make before creating the container for WAC and that is the port we want to expose WAC onto. That would be the port we connect to in order to use WAC. To make our life easier now, we will expose this port to the host but more sophisticated deployments might be appropriate depending on what you’re trying to achieve. We need to decide that first because we will then need this information when installing Windows Admin Center. We will make it available on port 8443.
docker run -it -p 8443:8443 mcr.microsoft.com/windows/servercore:ltsc2019 cmd.exe
If everything goes well you will have CMD prompt ready after starting the container. Now we need to copy the installation files into the container. You probably downloaded the WAC MSI from Microsoft website: please place that file inside the c:\ folder on the host. Get the Docker container ID by opening another command prompt and issuing a “docker ps” command:
CONTAINER ID        IMAGE                                           COMMAND             CREATED             STATUS              PORTS                    NAMES
9a4bb5975ee8        mcr.microsoft.com/windows/servercore:ltsc2019   "cmd.exe"           10 minutes ago      Up 11 seconds       0.0.0.0:8443->8443/tcp   hardcore_bouman
Container ID in my case is 9a4bb5975ee8. Now you can copy the WAC MSI file into the container. Note that if you created an Hyper-V instance (which is not our case) you will need to stop container before you can copy files into it but in our case we used process isolation so we can issue a command file this:
docker cp WindowsAdminCenter1910-RC4.msi 9a4bb5975ee8:c:\
Now we should be able to type a simple “dir” inside the container to display available files:
Microsoft Windows [Version 10.0.17763.805]
(c) 2018 Microsoft Corporation. All rights reserved.

C:\>dir
 Volume in drive C has no label.
 Volume Serial Number is 4E9D-71E0

 Directory of C:\

09/15/2018  10:42 AM             5,510 License.txt
10/06/2019  11:04 AM    <DIR>          Program Files
10/06/2019  11:02 AM    <DIR>          Program Files (x86)
10/06/2019  11:05 AM    <DIR>          Users
11/02/2019  06:21 PM    <DIR>          Windows
10/28/2019  08:55 PM        62,529,536 WindowsAdminCenter1910-RC4.msi
               2 File(s)     62,535,046 bytes
               4 Dir(s)  21,033,639,936 bytes free
In my case, file is for 1910 RC4 of Windows Admin Center but obiviously the name depends on what you downloaded. You can now issue a “exit” command and end container since we will need to perform other tasks before we can actually install.
Installation errors
What we should do now is starting a unattended installation for Windows Admin Center, which is pretty straightforward. However installation will fail because of the installer will attempt to change settings for firewall and CredSSP and that is probably not allowed in a container thus we need to transform the MSI installer to skip such actions.
Orca comes at the rescue! If you don’t know it, Orca is a tool by which you can generate transformations for the installer, that is changes to the installation process. There’s a lot of things that you can change and I’ll leave any experiment to the reader but what we are looking for it configuring msiexec to skip some custom actions.
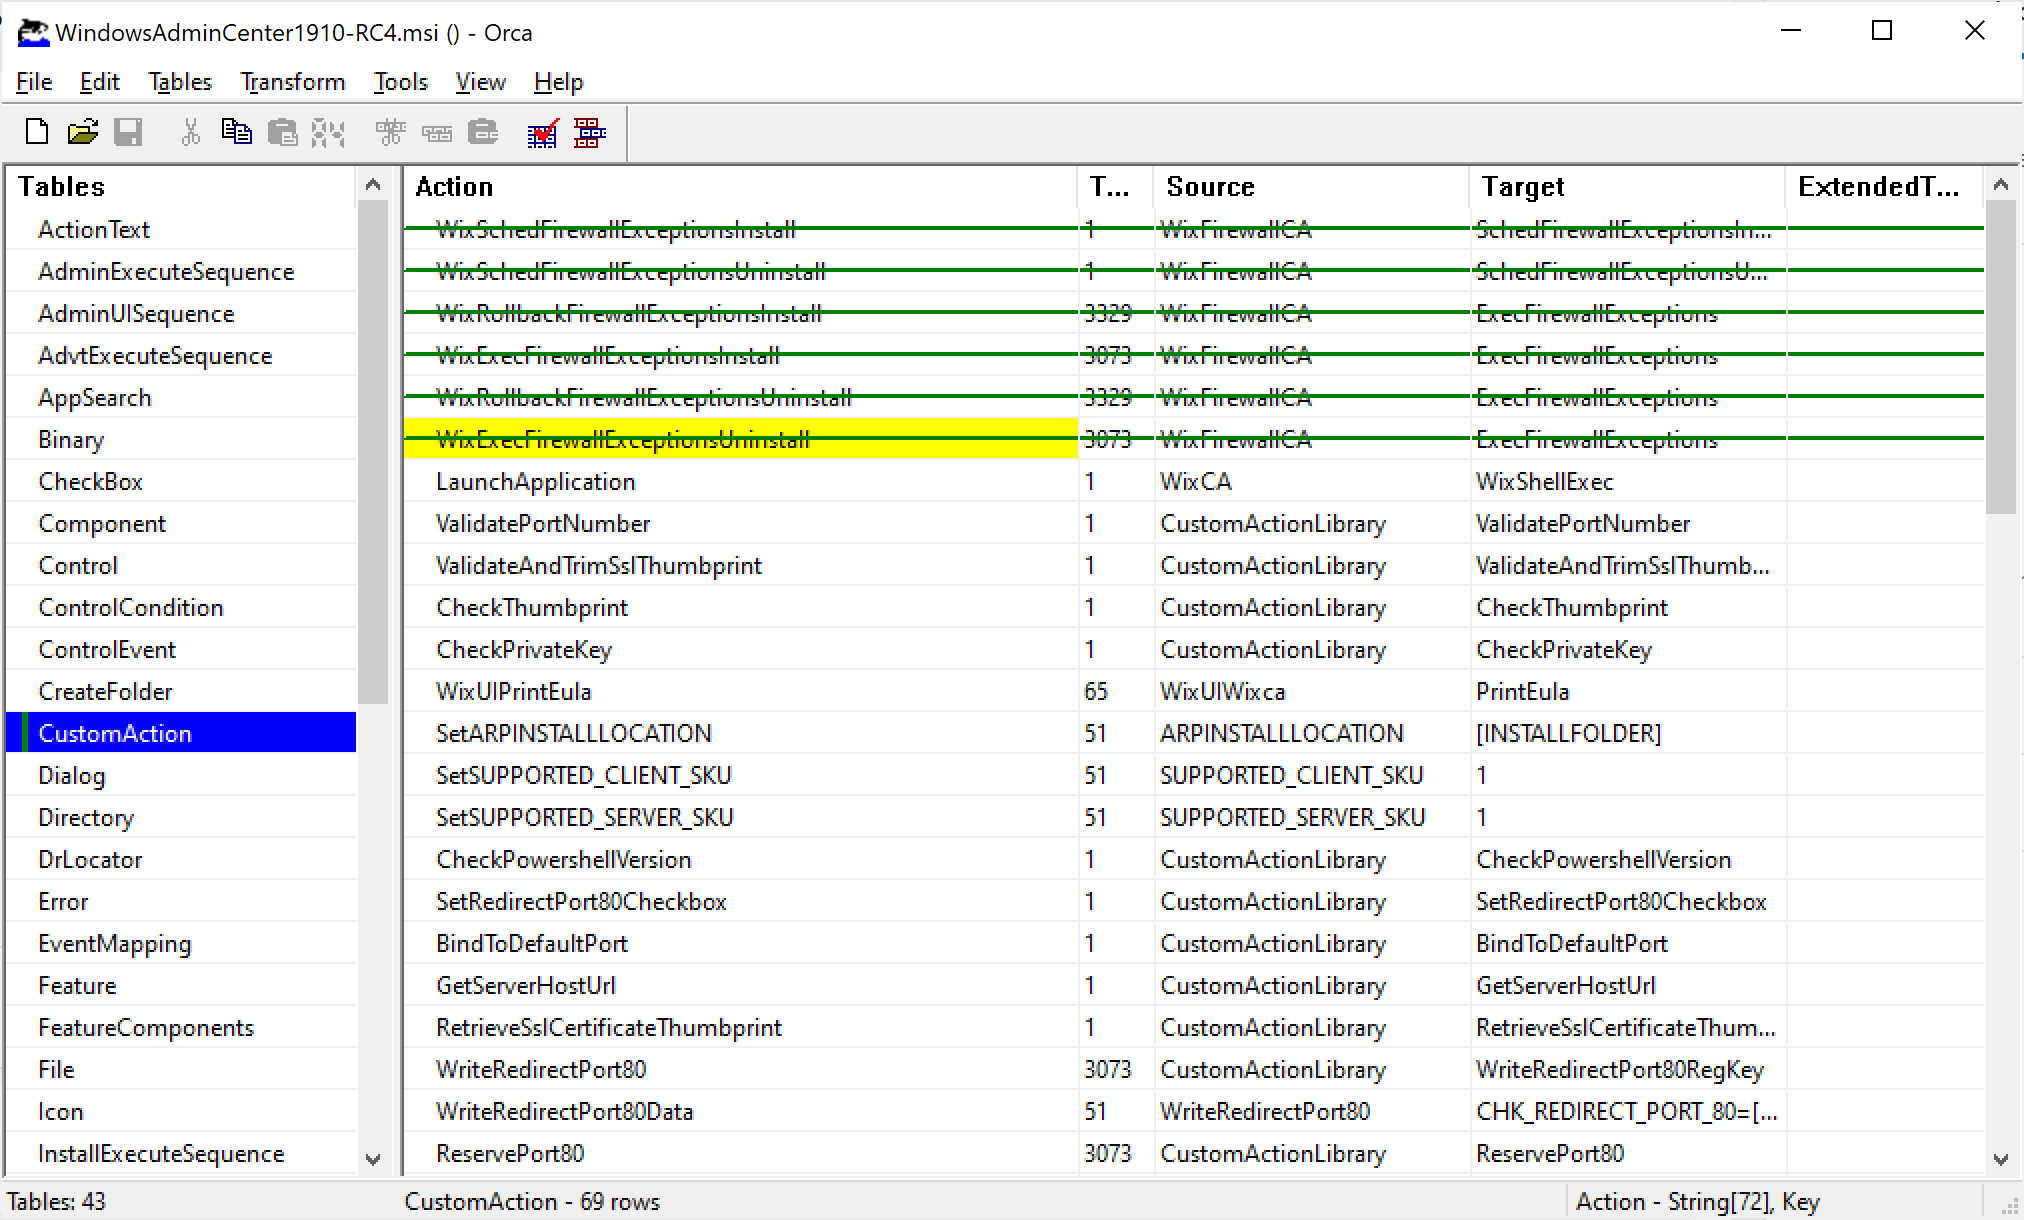
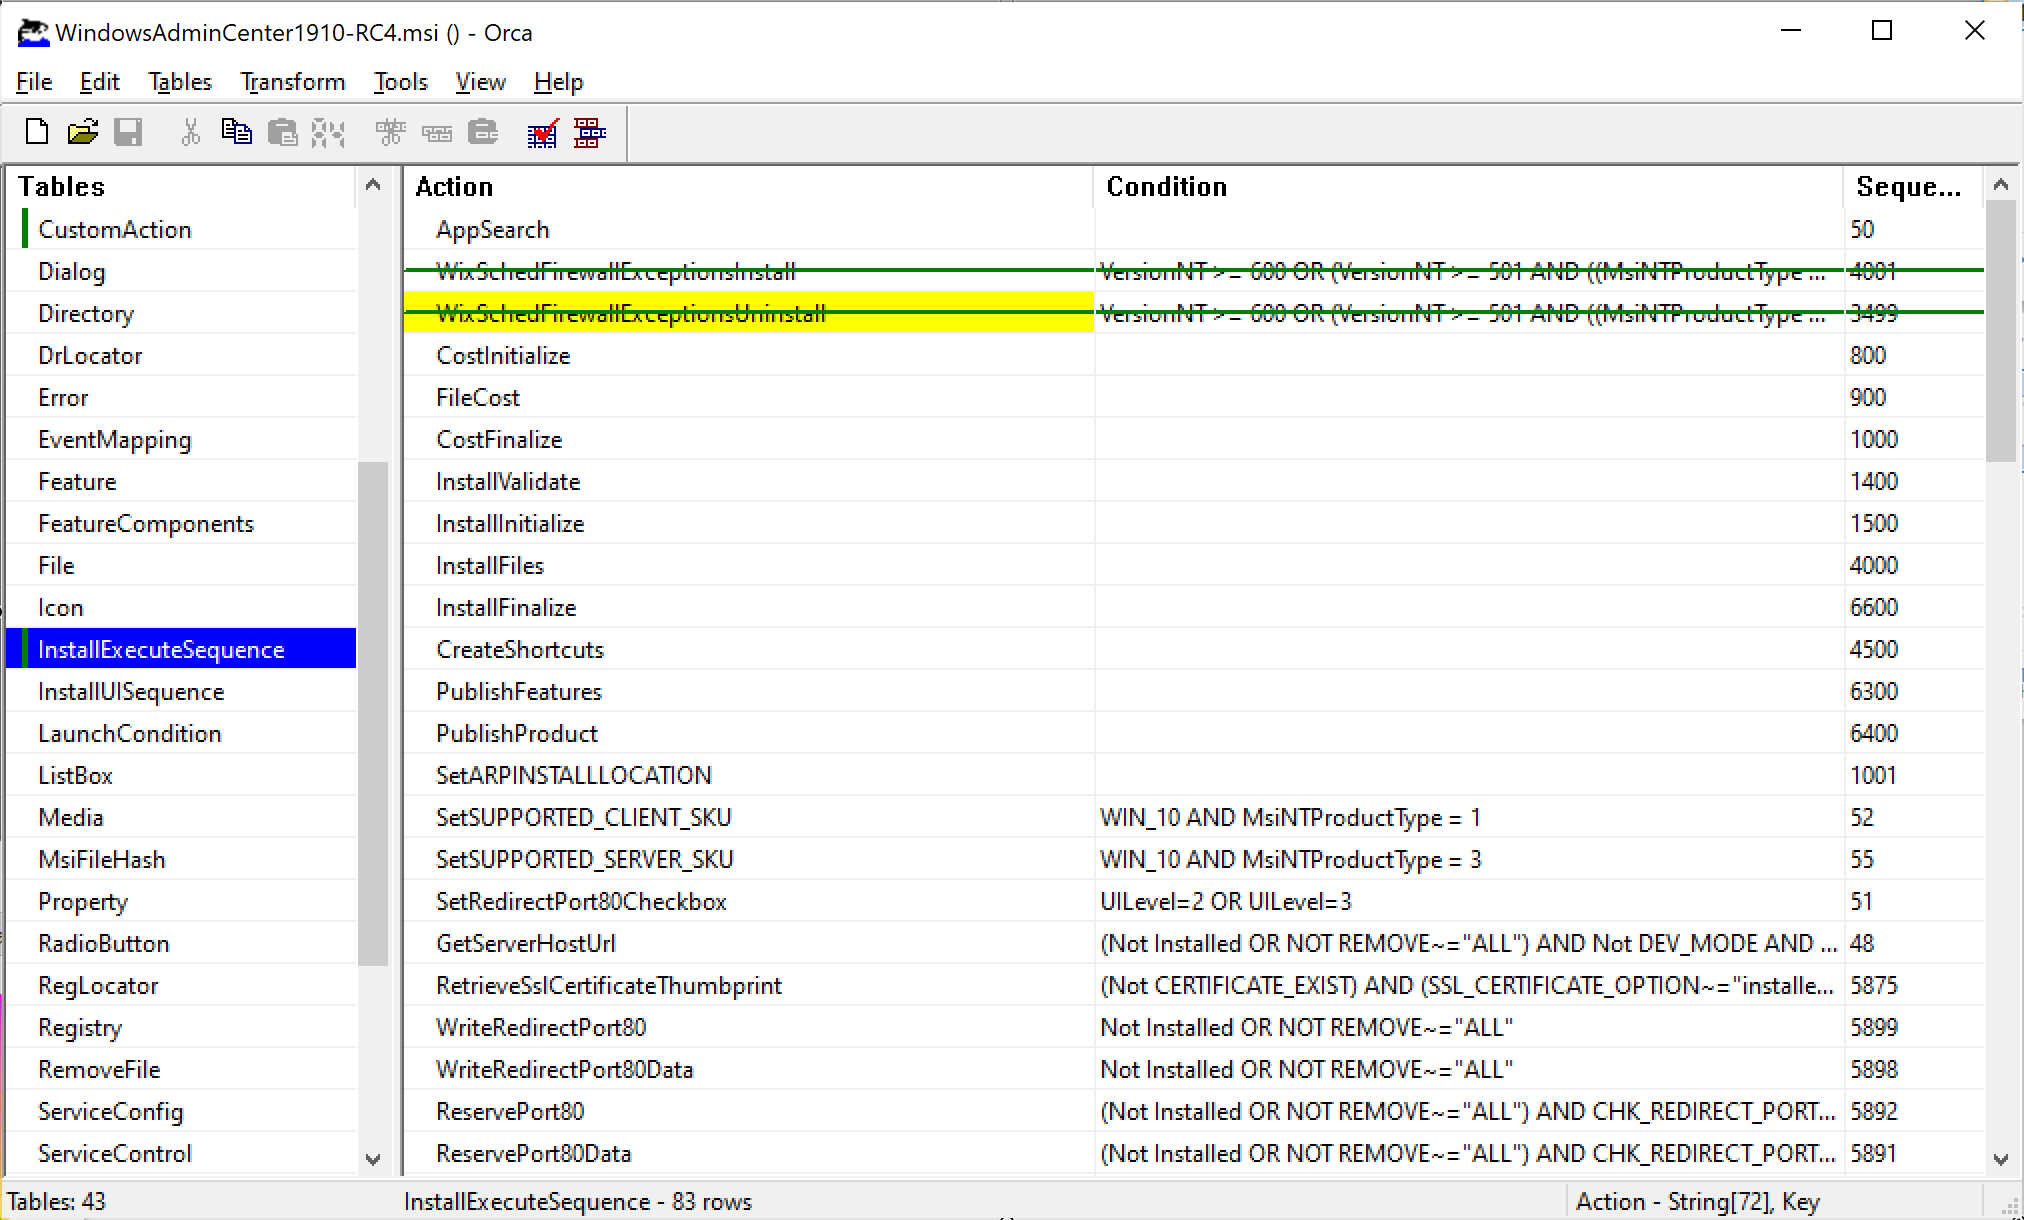
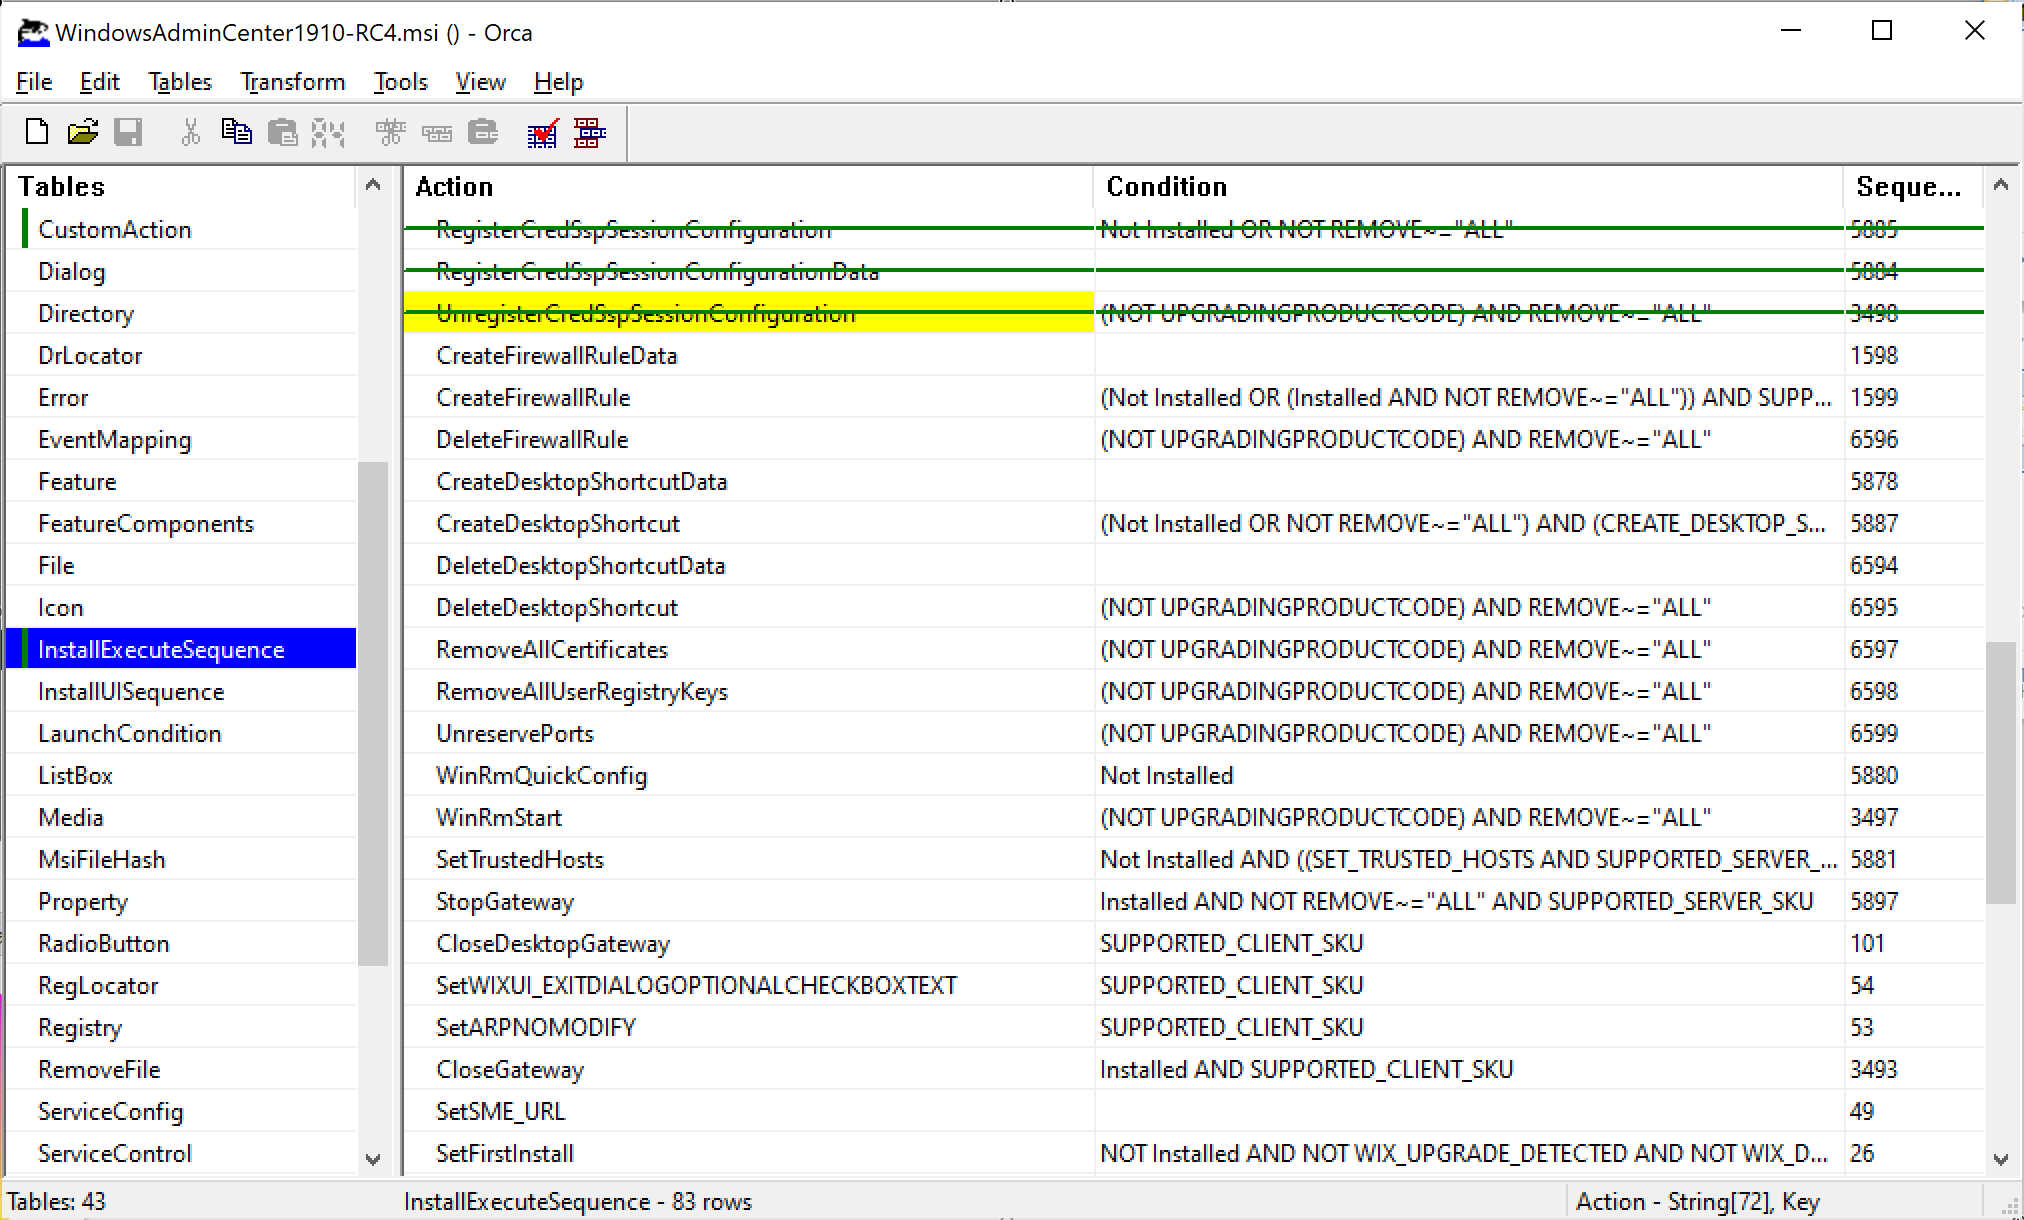
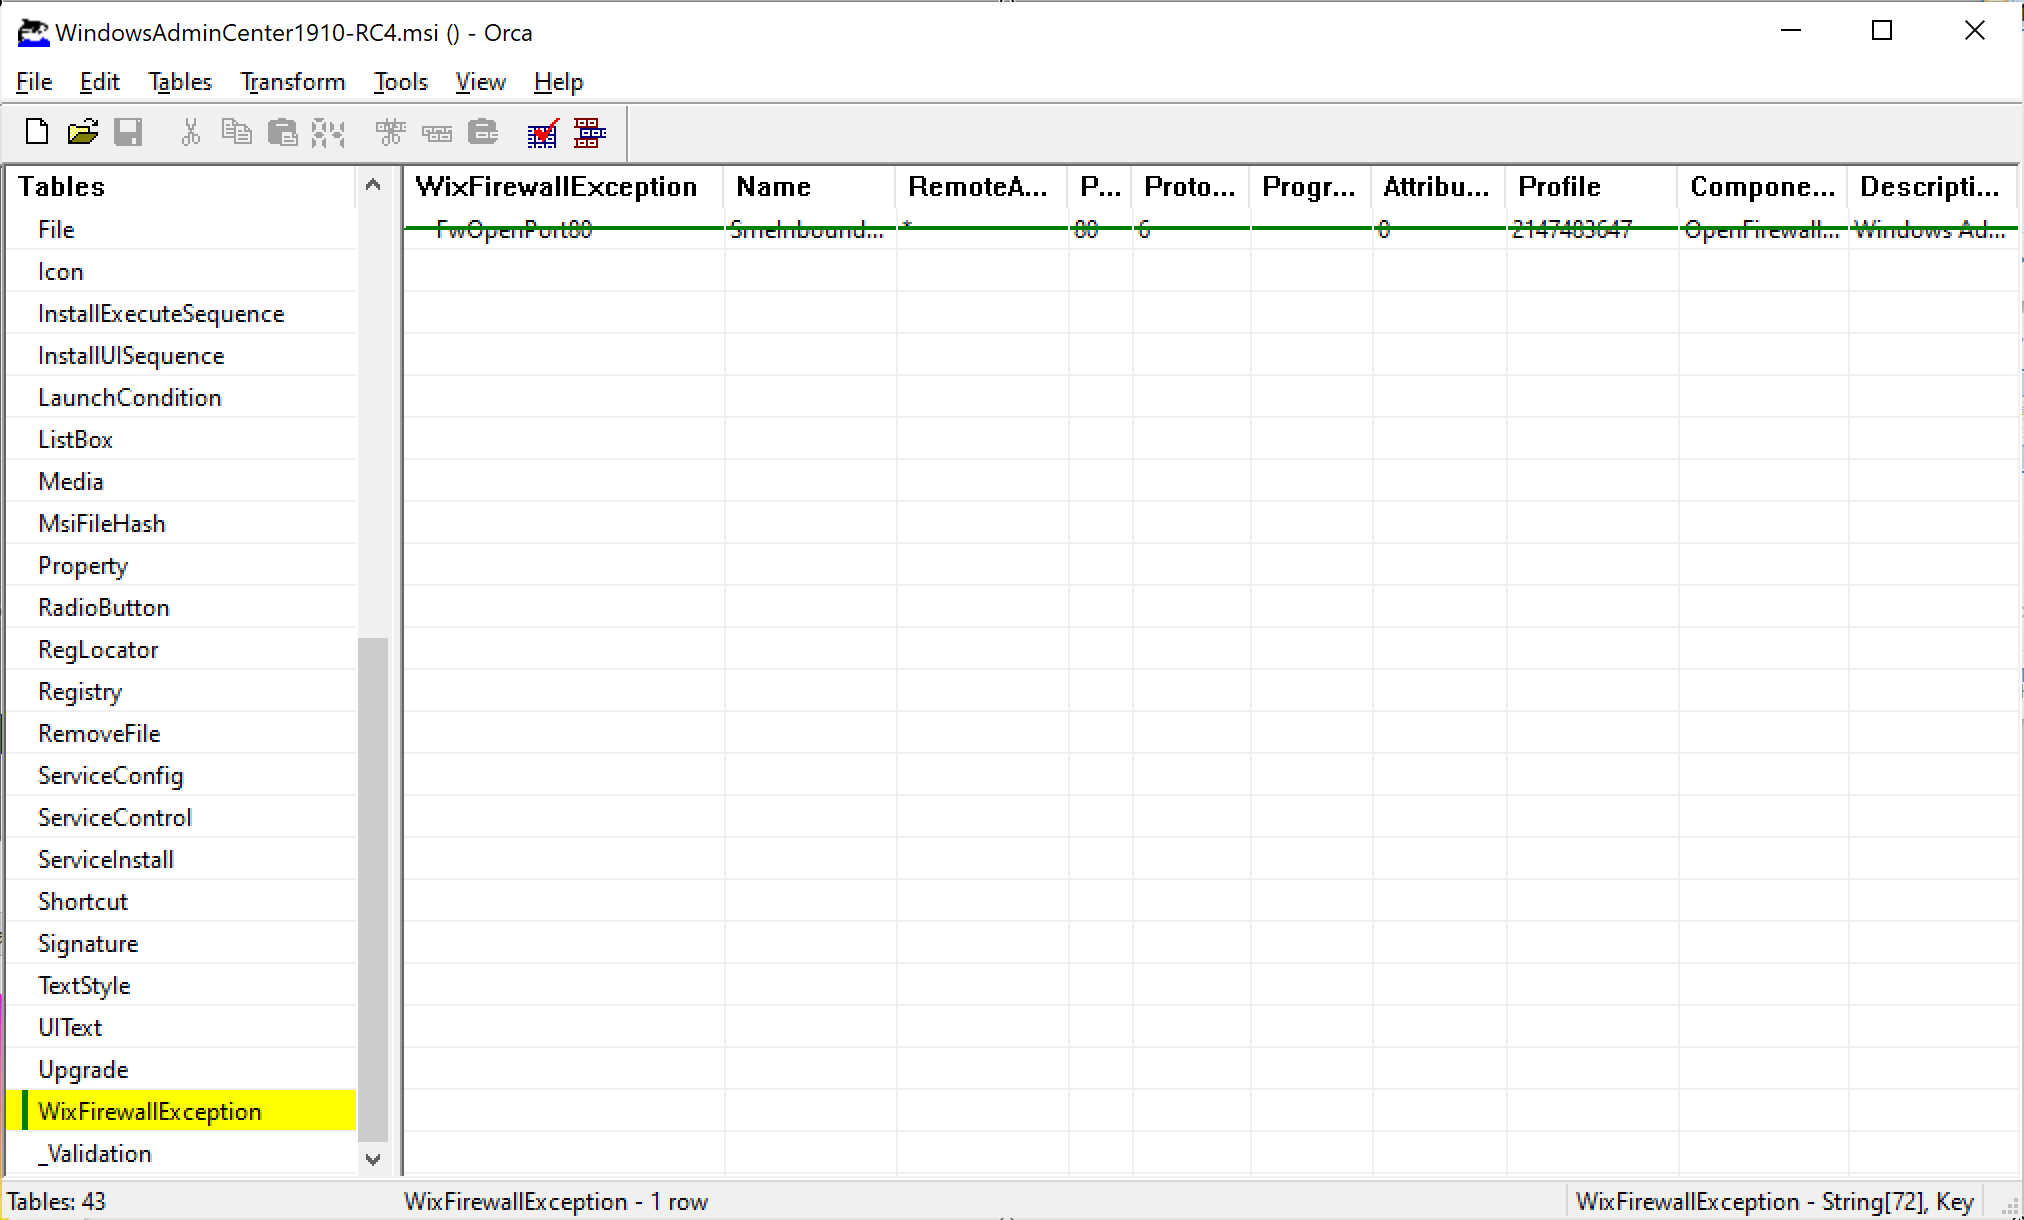
First of all, download Orca and install it. You can easily download it from somewhere on the Web. After installation open Orca and open the MSI installer for Windows Admin Center: it will list all those settings that you could change. After the MSI settings load up, select Trasform menu and click on New transform, then look for Custom action on the list on the left and look for the actions listed below. Right click + “Drop row” to disable them.
After you do this, click on Tranform menu and select Generate transform to create a new MST file that contains our transformations. Name it “WAC-NoFirewall-CredSSP.mst“. Time to go back to our container…
P.S. Remember that transformation files are only valid for the file they are generated from. If you change your MSI source file, you will need to regenerate your transformations.
Windows Admin Center installation
Ok, so we are ready. Back to the host restart your container by issuing
docker start 9a4bb5975ee8
As you probably remember, 9a4bb5975ee8 is my container ID. Now we have to copy our MST file inside our container
docker cp c:\WAC-NoFirewall-CredSSP.mst 9a4bb5975ee8:C:\
When done we have both our WAC MSI file and our transformation file MST inside the root of our container so it’s time to install. On your host issue a
docker attach 9a4bb5975ee8
to connect to container console. Ensure that you are inside the C:\ path and issue
msiexec /i WindowsAdminCenter1910-RC4.msi /qn /L*v log.txt SME_PORT=8443 SSL_CERTIFICATE_OPTION=generate TRANSFORMS=WAC-NoFirewall-CredSSP.mst
Ensure that the MSI filename is set to the one that you are actually using. Pay attention to the SME_PORT parameter: this must be set to the same port you opened in your container or you won’t be able to connect to Windows Admin Center. We are also generating a self-signed SSL certificated by this command and, most important, we ask msiexec to use our WAC-NoFirewall-CredSSP.MST file as a tranformation. A log of the installation will be stored inside log.txt.
If everything goes well you will read inside log.txt that WAC has been installed successfully.
Connecting to Windows Admin Center
Now that Windows Admin Center has been installed, you can open your browser on your host OS and browse to https://localhost:8443, ignore that self-signed certificate we generated and… you won’t be able to connect to WAC ! 😄
The reason for that is that you need to login using credentials for an administrator user but you don’t actually know the password for ContainerAdministrator user that is part of the container and your Administrator password won’t work inside your container. So go back to the console, attach container using “docker attach” if needed and issue the following commands
net user MyAdmin Pa$$w0rd! /add
net localgroup administrators MyAdmin /add
What you’re doing is adding a new MyAdmin user using Pa$$w0rd! as his password and add him to the Administrators group. That user won’t be part of the hosting OS and it will only exist in that specific container. Now you can connect back to Windows Admin Center and type MyAdmin / Pa$$w0rd! as your credentials.
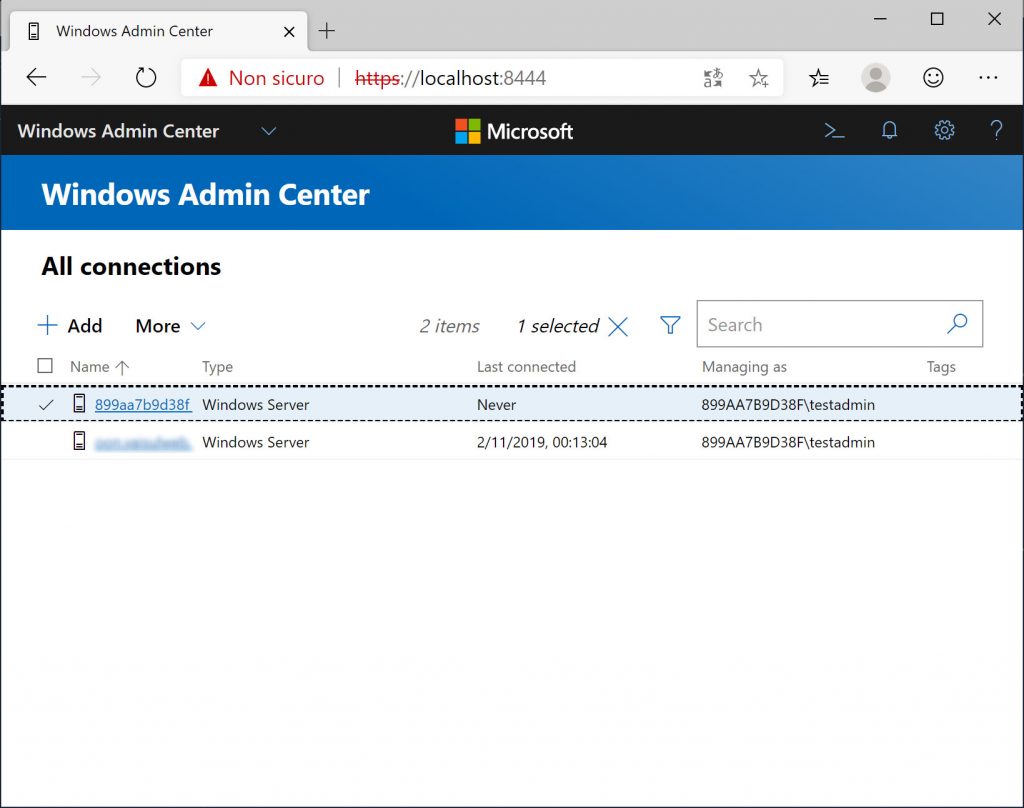
Note that your gateway will be displaied as the container ID (899aa7b9d38f, in that image) and your current user will be displaied as as [containerid]\MyAdmin (899aa7b9d38f\testadmin in that image).
Errors and limitations
There are a few quirks or limitations that you will face when working with Windows Admin Center installed inside a container. I wasn’t able to make Powershell tool to work fine when connecting to remote servers. Not sure what the problem is and I’m working with Microsoft to understand if this can be fixed. Other tools seem to work fine though I didn’t test them all.
This is by far the worst problem and I hope we can fix it. Then you have some tools not working when trying to connect back to container itself, that is the gateway in WAC terms. If you run a process-isolated container, you will be able administer it by using Windows Admin Center even if some tools won’t work: Powershell, files, firewall and so on. That is somewhat expected and not a real limitation. If you run Hyper-V-isolated container, you won’t be able to connect back to gateway, which as I said it is not a problem at all since you basically don’t need to manage your gateway.
If there’s a way for Powershell tool to work, deploying into containers could be a very handy option in many scenarios.


")


")
")

Thanks for the guide very interesting indeed, just a couple of questions:
– Can you control and monitor the host server running the container? I see that mostly all information is correct but the disk space is way smaller, probably only the container disk space.
– Have you successfully setup azure monitor on an instance like this?
– Do you have a working Dockerfile for this setup?
Best regards!